Dressmaking – black rib dress
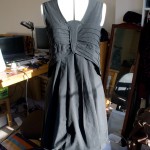
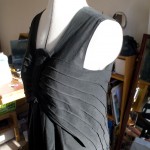
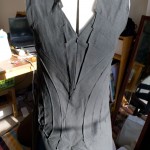
This dress design started out when I was experimenting with sewing curving pin tucks in to a rectangle of scrap fabric. I found that it fitted nicely over the breast when placed at an angle. The pin tucks reminded me of the rib cage. I liked the slightly anatomical look of the form. The skeletal form has beauty but is also a reminder of our mortality. I made a mirrored pin-tucked rectangle and sewed them together to form an inverted V. The two pieces of fabric met at the sternum. My next thought was how to was how to cover the join between the two pieces of fabric. I decided upon a decorated panel that mirrored the shape of the sternum. I probably did about 30 drawings of differently shaped sternum bits. Most of the designs were more elaborate than the sternum panel that made it on to the final dress design. I drew inspiration from 1930’s and Celtic designs.
At this point I got a bit stuck. My dressmaking tutor suggested getting a dressmakers’ dummy and making the dress out of a cheaper fabric before starting with the more expensive fabric. It would have been impossible to design the dress without a dummy to construct it on. So I started again using cheap, black poly-cotton to make the toile and actually making pattern pieces and recording what I was doing as I went along.
This is a very different method to how I am used to working. With my drawing I get a sheet of paper and start at a point and then draw. I might sketch out a layout. With dressmaking a lot more planning is required. You have to consider the order in which things are being put together. When designing you have to do everything twice or more. There’s no undo button on a sewing machine or when cutting fabric. A terrible design flaw. I am not a patient person so has taken some getting used to.
The rib-like inverted V lent itself to being rapped around the body and joining at the lower back. It took some adjustment to get the join at the back right. I added another pin tuck hidden dart on either side to get the shape right. I also made the top of each panel curved. I can’t quite remember how the back bodice came about. I think I had a scrap that suggested that shape when applied to the dummy.
I kept the skirt pretty simple. I cut a paper pattern piece with the top fitting the bottom of the inverted V bodice. I then inserted a rectangular paper section in the centre front where the pleats were going. I made regularly spaced vertical cuts into the bottom edge of the pattern piece and fanned them out to add volume to the skirt. I wanted to join the skirt to the bodice in a way so the bodice hung over the skirt and the join was invisible. It was tricky and didn’t quite work out. I hemmed the skirt with black bias binding.
The materiel used is handwoven, organic, fair trade cotton from Bishopston Trading. It was a very nice material to work with.


